Add Row
Add Element
cropper
update
Pearl City Local
update
Add Element
  • Home
  • Events
  • Deals & Promos
  • Directory
  • Categories
    • Featured
    • Business Spotlight
    • Local News
    • Wellness
    • Health
    • Lifestyle
    • Home & Garden
    • Travel
    • Pets
    • Food
2 Minutes Read

Naulu Apartments Opens in Aiea, Delivering 302 Affordable Homes with Ocean Views

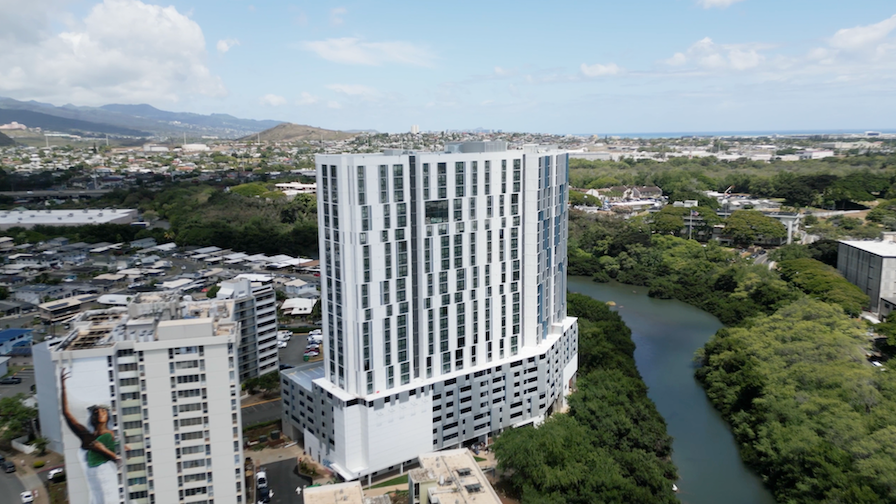
Aiea just welcomed a major addition to its skyline—and to its affordable housing landscape.

The newly opened Naulu Apartments, a 25-story residential high-rise, now offers 302 affordable units to local families earning between 30% and 60% of the area median income. Nestled next to Halawa View and overlooking the historic Pearl Harbor, the development represents a major step forward in addressing Hawaii’s housing needs.

But this isn’t just about square footage—it’s about building community.

Modern Living with Island Style

Designed by local firm AHL and built by Nordic PCL, Naulu Apartments features a mix of studio to four-bedroom layouts, each outfitted with contemporary finishes, air conditioning, and ADA-accessible design. The building’s thoughtful amenities set it apart: residents can enjoy a fitness center, a rooftop sky lounge, keiki-friendly study spaces, and outdoor barbecue areas perfect for pau hana gatherings.

A colorful, large-scale mural by Hawaii artist Kamea Hadar adds a unique cultural touch to the space, infusing the building with a vibrant sense of identity and place.

A Major Investment in Affordable Housing

With a total cost of $168 million, this project is Hawaii’s largest Low-Income Housing Tax Credit (LIHTC) development in over 15 years. Its success is thanks to a strong public-private partnership that includes the Hawaii Housing Finance and Development Corporation (HHFDC), Hunt Capital Partners, the City and County of Honolulu, and Bank of Hawaii.

This collaboration made it possible to deliver quality housing at scale—a critical win in the fight to make Hawaii more livable for working families.

More Than Just Apartments

Beyond providing homes, the project was intentionally designed to foster a deeper sense of connection among residents. With shared spaces, cultural elements, and family-oriented features, Naulu Apartments is positioned not just as a place to live, but a place to belong.

And with its location in the Halawa Transit-Oriented Development (TOD) zone, it’s expected to play a central role in future growth and revitalization of the area.


Hawaii is facing a housing crisis—but projects like Naulu Apartments show what’s possible when thoughtful design, community values, and strategic investment come together.

Local News Home & Garden

Write A Comment

*
*
Related Posts All Posts

Repairing Vinyl Plank Flooring: Easy Guide for Pearl City Residents

Update Your Guide to Repairing Vinyl Plank Flooring in Pearl City Have you noticed some scratches, dents, or water damage on your vinyl plank flooring in your Pearl City home? Don’t worry; repairs are often more straightforward than they may seem. Just like any flooring material, vinyl planks can sustain damage, but the beauty lies in their ability to be repaired or replaced with minimal fuss. This article provides you with a comprehensive, step-by-step guide tailored specifically for residents keen on DIY home improvement. Understanding Vinyl Flooring Durability Vinyl plank flooring is celebrated for its durability and aesthetic appeal, available in various designs that mimic wood or tile. However, it is not completely immune to wear and tear. Many homeowners are unaware that even high-quality vinyl planks can become damaged over time due to heavy foot traffic, furniture movement, or moisture exposure. Recognizing how to repair these pieces, instead of opting for a costly total replacement, is both a cost-effective and satisfying solution. Tools and Materials Needed for Vinyl Plank Repair The first step in your repair process is gathering the right tools and materials. Here’s what you’ll need for a successful DIY initiative: Tools: Chisel, Circular saw, Hammer, Utility knife, Pry bar, and Rubber mallet. Materials: Replacement plank, Superglue, Finish nails, and, if necessary, new baseboard material. Having these tools on hand before you begin can streamline your repair process and minimize frustration. Step-by-Step Method for Repairing Vinyl Planks Follow this easy method to replace damaged planks quickly, ensuring your floor looks as good as new. 1. Identify the Damage The first step is to assess which planks require replacement. This will help you determine whether you can proceed with the restoration or if professional help is necessary, especially if the damaged area is large or central to a room. 2. Remove the Baseboard To gain access to the planks, use a utility knife to score the top edge of the baseboard, cutting any bond with wall paint. Carefully remove it utilizing a hammer and pry bar. This allows you to expose the edges of the planks that need to be fixed. 3. Unclick and Lift the Damaged Plank If your planks are of good quality, they can usually be unclicked and lifted out without causing damage to the surrounding pieces. Start in a corner of your room and work your way towards the damaged section. 4. Install the Replacement Plank Fit the new plank snugly into place, ensuring it aligns properly with adjoining planks. If needed, use super glue to secure it but be cautious, as overly gluing can lead to adhesion problems later. 5. Reinstall the Baseboard After the new plank is in place and secured, replace your baseboard by hammering it back into position. This final touch will cover any gaps or unsightly edges you might see and will complete your quick repair project. Common Pitfalls to Avoid During Repairs While replacing vinyl planks is manageable, certain common mistakes can hinder your repair. Avoid these pitfalls: Choosing Low-Quality Adhesive: This can lead to premature failure of the plank. Neglecting to Measure: Always measure the new plank against the one being replaced to ensure a proper fit. Forgetting to Prepare the Subfloor: Any debris underneath can affect the level of the newly installed plank, making it unstable. Future-proofing Your Vinyl Flooring Once your repairs are completed, consider how you can avoid future issues. Regular cleaning, using protective mats in high-traffic areas, and keeping humidity levels stable can prolong the life of your vinyl planks. Regular inspections of your flooring can help you catch potential issues before they require significant repair. Embracing DIY Home Improvement Taking the time to repair your vinyl flooring not only enhances the appearance of your home, but it can also provide a fulfilling sense of accomplishment. As a Pearl City resident, getting hands-on with your home improvement projects can help you save on costs while gaining valuable skills along the way. By understanding the process and being equipped with the right tools, you can ensure your floors remain a stunning asset to your home. If you consider larger projects beyond your expertise or that would benefit from professional touch, don't hesitate to reach out to local contractors.

Made With Aloha: A Weekend of Local Finds at Pearlridge Center

Looking for something fun to do this weekend in Aiea? Head over to Pearlridge Center for the Made With Aloha Gift Fair, a two-day shopping event filled with handcrafted treasures, ono snacks, and locally made goods from Hawaii’s favorite small businesses.🗓️ Event Details:Dates: Saturday & Sunday, July 19 & 20Location: Pearlridge Center, Mauka WingAdmission: FreeParking: Plenty availableWebsite: islandcraftfairs.orgContact: (808) 688-6638 | info@islandcraftfairs.org✨ What to Expect:Shoppers can browse dozens of vendor booths throughout both phases of Pearlridge Center. Whether you're searching for the perfect gift, something sweet to snack on, or a one-of-a-kind handmade creation, there’s something for everyone—each item crafted with care and aloha.Expect to find:Handcrafted jewelryUnique gifts and home decorLocal snacks and prepackaged foodsSmall business passion and aloha in every product🎁 Giveaways All Day Long!That’s right—just for showing up, you could score fun freebies while you browse. With free admission and all-day giveaways, it’s a win-win shopping experience.💡 Need Cash?ATMs are located near Center Court, the Food Court, and Lavish Nails on the ground level for your convenience.🛍️ Featured Vendors:A few of the amazing local vendors include:Kissy HawaiiGenova HawaiiTasty Jerky Hawaii LLCProject Sora LLCVivisWorldLittle Craft ShackMauna i Kai DesignsCrafthouse-hi…and many more!🎨 Saturday Only:Iliana Collection LLCMy Kawena Creations🍰 Sunday Only:The Little Whisk HI🎨 Interested in Becoming a Vendor?Island Craft Fairs is still accepting applications for a wide range of businesses—from food and produce vendors to retail and handmade crafts. Participation for both days isn’t required. The application deadline is Wednesday before the event at 4 PM HST.Don’t miss this opportunity to shop local, support small businesses, and experience the spirit of aloha in every aisle. Come find your new favorite snack, gift, or handmade gem this weekend at Pearlridge!

Empower Your Home: DIY Heat Pump Thermostat Wiring Made Easy

Update Why Upgrade Your Heat Pump Thermostat? Residents of Pearl City often look for ways to enhance their homes, and upgrading your heat pump thermostat is a clever and achievable project. This simple change can lead to improved energy efficiency, better control of your indoor temperature, and increased comfort in your living space. Rather than overhauling your entire HVAC system, a new thermostat can provide a fresh perspective on your heating and cooling needs. Essential Tools and Materials for Your DIY Project Before diving into the wiring process, equip yourself with the right tools and materials. You will need a few essentials: a non-contact voltage tester for safety, screwdrivers (both Phillips and flathead), wire strippers, and light-colored tape for labeling wires. Ensure you also have your new heat pump thermostat and any mounting hardware, as this will streamline the installation process. Step-by-Step Guide to Wiring Your Heat Pump Thermostat The process might sound daunting, but here’s a simple breakdown to empower your DIY journey. Turn Off the Power: Safety first! Always shut down the power to your HVAC system at the breaker box. Verify the Wiring: After removing the existing thermostat’s faceplate, your next step is to ensure no power is present with a voltage tester. Take detailed notes and pictures of your wiring setup for reference. Remove the Old Thermostat: Disconnect the wires carefully while keeping track of their original positions. Attach the New Thermostat: Follow the manufacturer’s instructions to connect the new thermostat, ensuring a snug fit and proper wiring connections. Power On and Test: Once everything is in place, turn the power back on and test your new thermostat to ensure it operates as expected. Potential Challenges and Solutions During your installation, you may encounter some common issues such as mismatched wiring or difficulty accessing your HVAC system. It’s crucial to consult the instructions that came with your product and, if in doubt, seek help from a professional. For residents of Pearl City, local HVAC service providers are available should you need additional support. Future Predictions: Smart Thermostat Technologies As technology advances, so do thermostat features. Smart thermostats are becoming increasingly popular, providing remote control capabilities and energy-saving algorithms. These devices learn your habits, allowing them to adjust temperatures automatically for optimal comfort and efficiency. Unlock the Unique Benefits of Upgrading Upgrading your heat pump thermostat is not just about home improvement; it's about enhancing your quality of life. With the right unit, you can enjoy consistent temperatures, decreased energy bills, and a home that effortlessly adapts to your needs. Imagine coming home to a perfectly warm or cool environment after a long day, all thanks to your DIY project. How Residents Feel About Their Home Improvement Projects Many Pearl City residents take pride in their home improvement tasks. Personalized projects foster a deep connection to one’s living space and contribute to community pride. Whether it’s a do-it-yourself project or a professional installation, the satisfaction of making improvements is evident and contagious. Ultimately, undertaking the challenge of wiring a heat pump thermostat is a fulfilling endeavor that adds value to your home, both emotionally and financially. Are you ready to enhance your home and embrace the benefits? Don’t hesitate to start this rewarding journey today! For more guidance on DIY home projects and other local updates, feel free to sign up for our newsletter. Keep enhancing your home with hands-on tips that can help you succeed!

Terms of Service

Privacy Policy

Core Modal Title

Sorry, no results found

You Might Find These Articles Interesting

T
Please Check Your Email
We Will Be Following Up Shortly
*
*
*